This Ikea Flisat table hack with upgrade your Ikea kids table for endless fun and possibilities. You can add more creative ways to use your Ikea sensory table to expand sensory play, language development and fine motor play with our kids.
I hope to share ideas with you all on possible ways to use the Flisat table with the Skadis pegboard hack.
See below for details and links.
This post contains affiliate links. I may receive a commission, at no cost to you, when you choose to use the links provided.
I love this table and the ability it gives me to keep changing it up and creating new ways for tactile play and exposure for my little one. But now with the expansion of the Skadis peg board we can hang this, display things, and expand theme like play to relate to the bins.
PRODUCTS NEEDED
You can purchase your products directly from an IKEA store or you can purchase via Amazon and Etsy. Our table is actually from Etsy and it is similar to the IKEA one and IKEA bins work with this table.
There are many different ways to customize your pegboard! Get creative! I really like the clips to hang photos or laminated social stories for visualization. I also like the hooks for hanging a book opened for display!
We have another DIY project update to share with you all! This project toke many weeks to finish and it was a learning curve for me. However there was much growth and knowledge learned from this project so for that I am grateful.
Our home has no custom moulding really anywhere. The walls are plain and cold feeling to me. We have a long plain wall in our living room that I envisioned some kind of moulding to upgrade the space.
After much Pinning on Pinterest and back and forth I decided on a picture frame moulding look. I decided on this because I think it would look nice to have family photos hung on this wall and the picture frame moulding will compliment each other well.
What is panel moulding
It is an interior finish to a space to create the impression of panelled walls. It can come in a variety of shapes and styles. The beauty of it is the freedom and creativity to customize it to your space and aesthetic.
Installation
The installation process is not difficult but it is time consuming. The prep is the longest part of the process. Deciding on the measurements toke me the longest time.
After you sketch or design your desired moulding then you can plan your measurements. Start by obtaining all the measurements of your walls. If you are looking for a formula to start with check out The Coastal Oak blog
She did a great job to help me have a starting point and then customize my spacing according to my measurements and my space.
Step 2: Cuts
Once you have finalize your measurements you are ready for your cuts. Using a miter saw to help with your cuts. Take your pieces and test them out on the floor to ensure that they all connect.
Step 3: Installation
Using your laser leveler install your pieces one by one with a brad nail gun. We found installing the first top piece of your rectangle shaped helped us the most. Use your hand lever to ensure that your pieces are leveled BEFORE you nail them.
Once it is leveled then install with your nail gun. I liked to start the nailing in the center of my piece and then working my way out. We used about 8-10 nails in each piece.
Then I installed each of the side pieces and make sure that they are leveled.
Lastly you install your bottom piece.
Once your pieces are installed, you can fill the nails with wood filler and ALL your edges with caulk. Sand your wood filler when dried.
Step 4: Paint
Since my PVC moulding is white I didn't have to prime. I painted the moulding the same color as the wall which is Sherwin Williams Alabaster. To apply I used one of my favorite paint brushes.
I love the finish and look of moulding in your home. It is an affordable way to upgrade your home. It is a great project for beginners. There are tons of Youtube videos out there for more in depth instructions if you need more help and questions.
Bench cushion are expensive! So I am sharing my no sew bench cushion to inspire you all to try to create one yourself and save money!
What I love about creating a bench cushion yourself is that you can customize it to any fabric you like and you can keep customize it! When your ready for a change just staple another fabric right over the existing one.
This is a quick easy project that you can do in a couple hours.
You can make one without or with plywood underneath. I chose to use plywood because I happened to have some scrap and the more room we can make in our garage the better!
I found my fabric at Hobby Lobby because they had a sale for 40% off. Since it was also my first time I didn't want to invest too much money on an expensive fabric in case I messed up!
I first cut my plywood to the dimensions of my bench. Then I cut it with our table saw and sanded the edges a little bit.
After that I measured and marked my foam. I used a ruler and a marker to create a guide of where I was going to cut. To cut my foam I read lots of tutorials that used a bread knife. After using it I personally wouldn't use it again. I found it hard to cut.
Next I measured my fabric. I wanted it to have 6 inches of length on both sides more than the wood base. I wanted enough fabric to work with when wrapping it around my wood and foam.
Once I had my fabric ready I used my staple gun to lock it in place.
The corners were the last step and I decided to fold mine like a present. I toke the side pieces and folded it in and the middle pieces which formed a triangle shape I brought it to the top of the wood base. It worked for me and looked good.
That's it! Looks so good and the whole project cost under $100!
I first measured how far apart I wanted each wood peg. For reference mine are 11inehes apart. I marked my space with a pencil and measured from that space where the center was on the board.
Drill your Holes
After I installed the bit size that I needed for my wood pegs I installed it into my impact driver and drilled in the space that I marked.
I drilled straight in as oppose to an angle. My husband spotted me and helped me with the first one because I was so nervous to mess it up! I went all the way through and went back and forth with my driver a few times to make the hole a bit wider.
Sidenote: this leaves a mess so make sure you move anything underneath you out of the way!
Install Pegs
Take your pegs and using your rubber mallet tap it into each hole. You can add glue if you want before hand.
Sidenote: If you are going to stain or paint your pegs you can do this step before installing into the wall. I stained mine for a bit of a darker color and then installed.
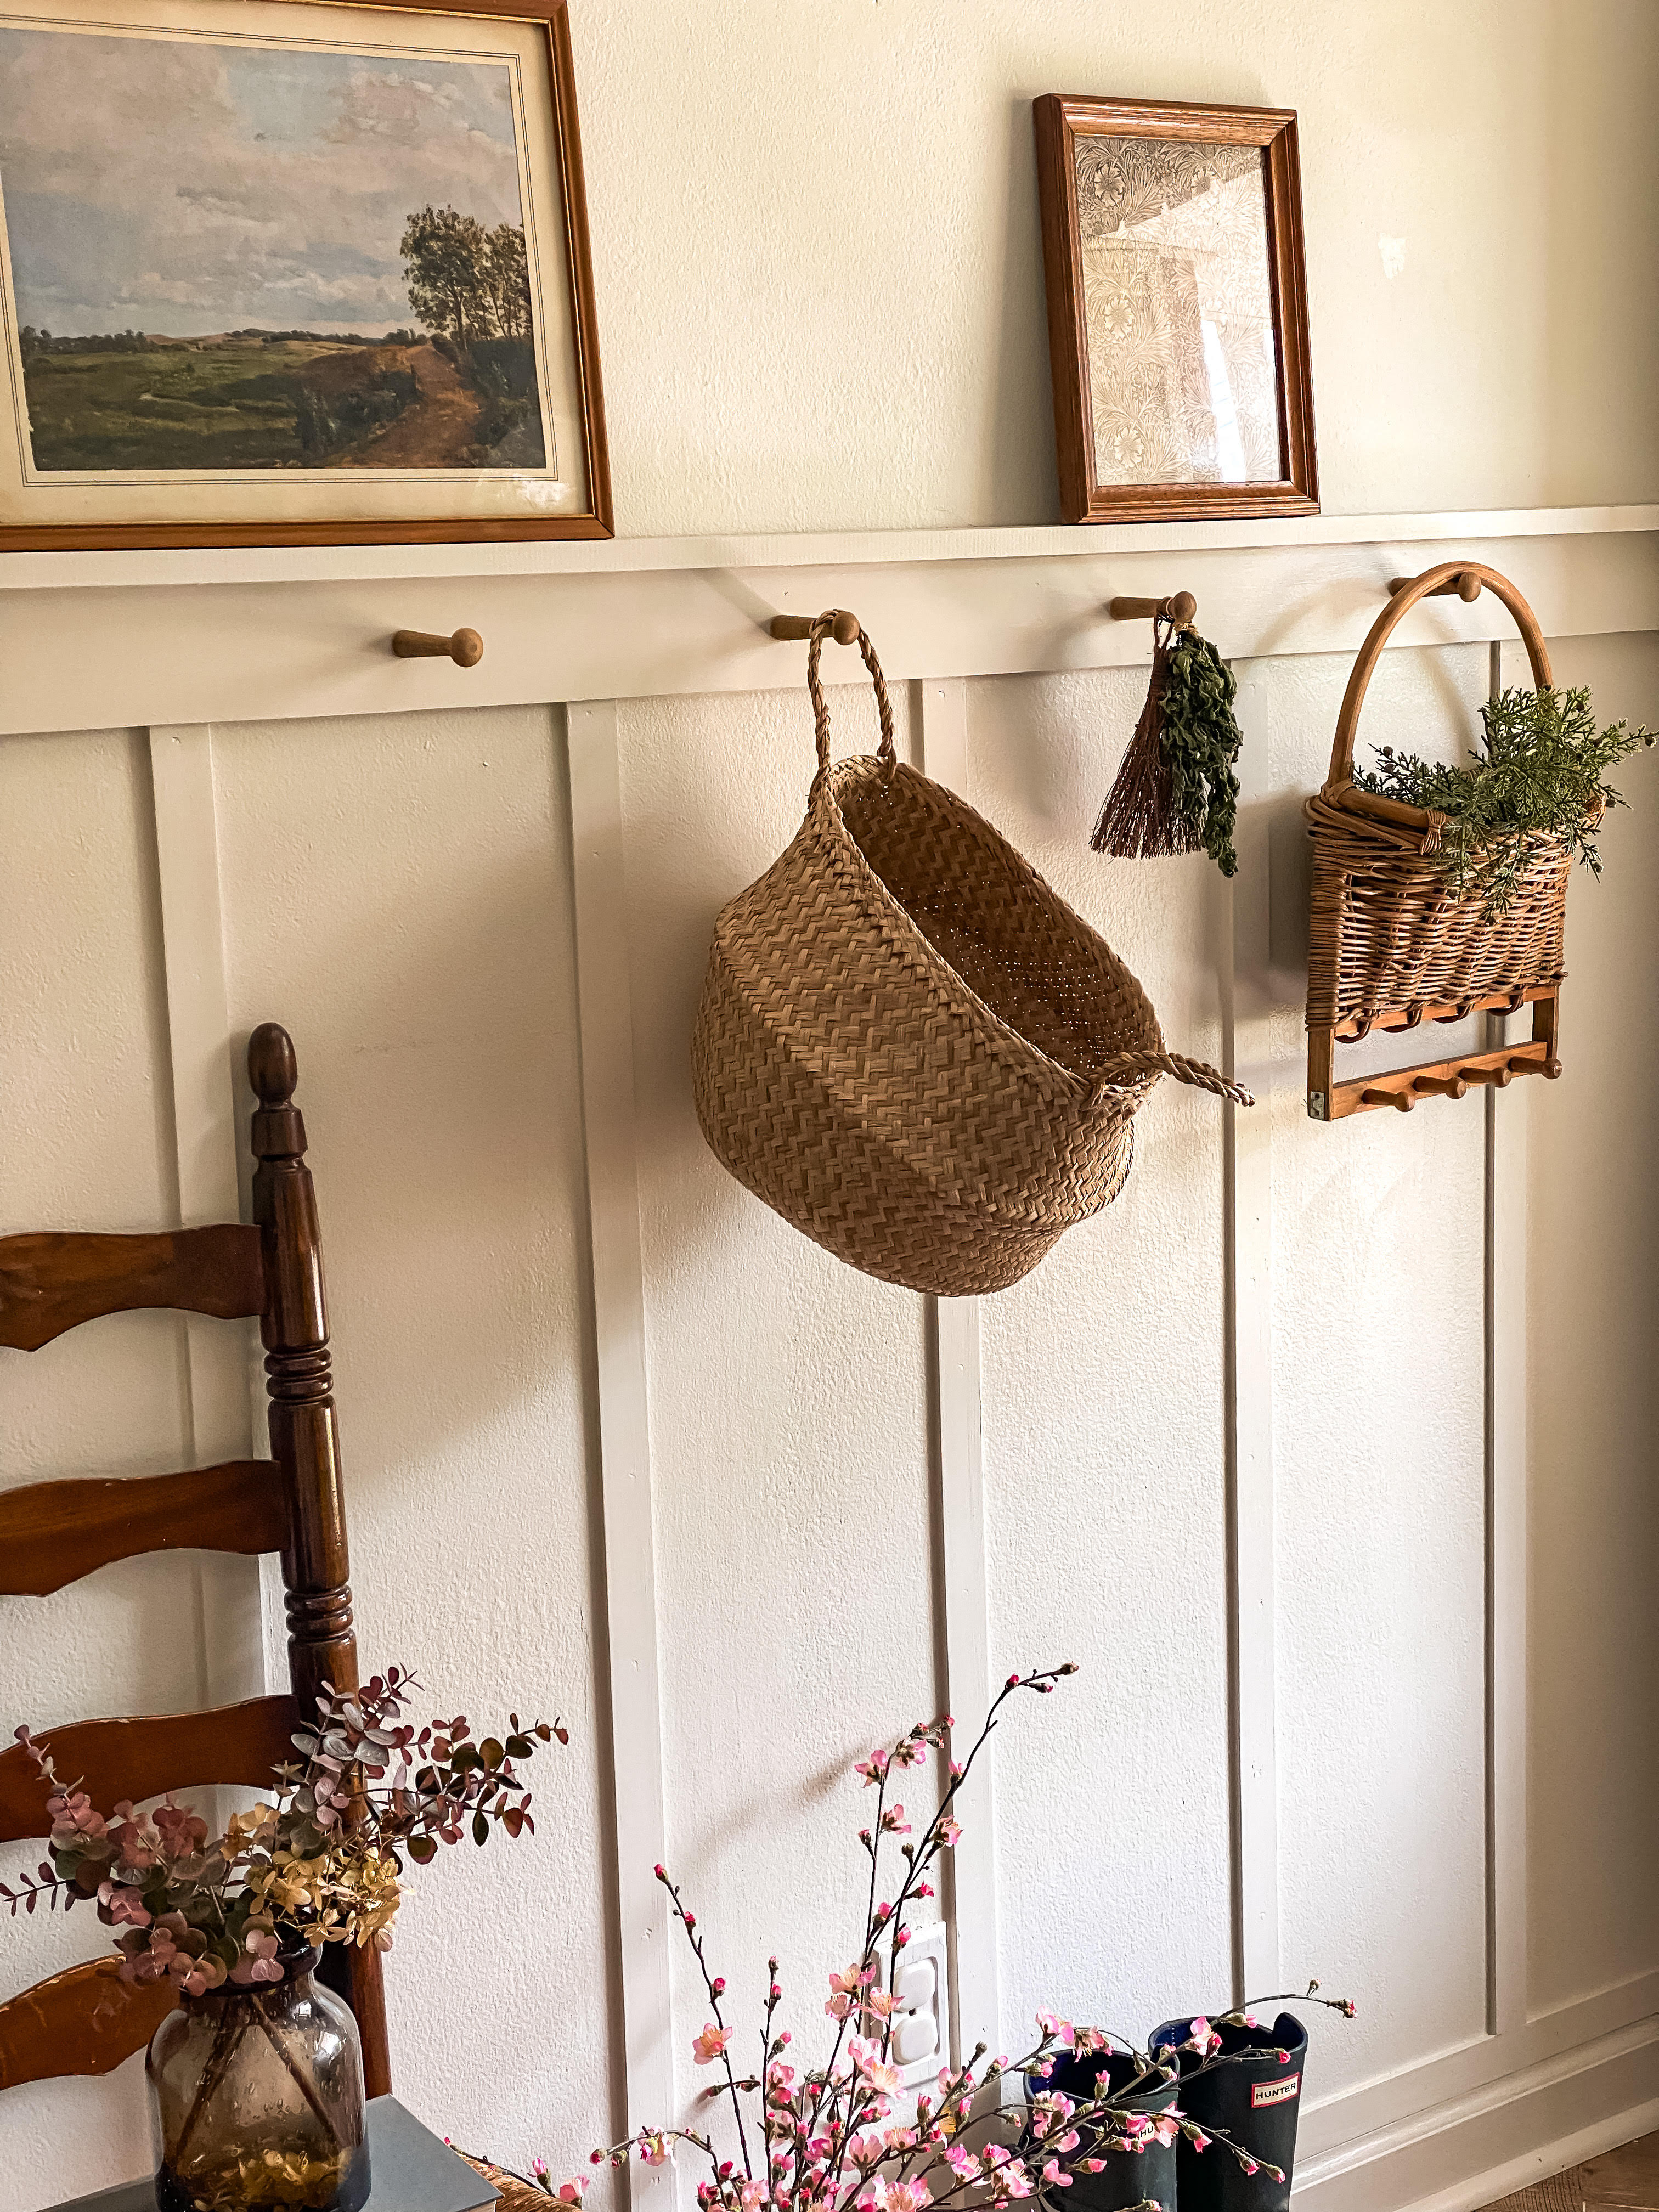
Once they are firmly into the wall you are all done and ready to hang up and decorate your space!
Board and batten and wood peg rack is a great beginner DIY project!
Its cost effective and adds value and organization to your home. It's a satisfying sight to see spaces in your house come together to become your home.
Our home had nothing in this space. In fact it was actually a darker purple color on the walls. We painted all the walls Alabaster by Sherwin Williams.
I knew quickly I wanted to add a design feature in this narrow space. Its not our main entrance but it leads to our front yard small steps area and I like to keep the door open for light and fresh air. I also had in mind of creating a Montesorri get ready area for my little guy in this space.
1st step is to measure your space. The height is yours to customize. For reference mine height is 55 1/2 inches.
Next was how far apart would the vertical battens be. For reference mine are from center to center 12 inches apart. Mark each space with a pencil.
Making your cuts
I didnt want to rip out the molding so I grabbed pine lattice wood from
Home Depot to place above the crown mounding and use for our vertical
wood placement. Its thin enough that it wont come out too much and
appears cleaner as if it was all one design.
I then installed the the 3 x 1/2 board. Level it before installing. This helped me with the installation of the vertical batten to be even and flushed against it. You want to make sure that your vertical battens are level.
Each vertical batten will not be the same height due to my floor being uneven. Once they were all added to the wall I began to caulk. Caulk helps you fill in any gaps shown and will result in a seamless final look.
After the caulk I covered the nails with wood filler. Follow the directions on your wood filler. Once dried I sanded with a sanding block for a smooth look.
Final step was to cut and nail down my top shelf. Ensure that your brad nailer is angled to ensure your nails connect both the top shelf to your peg board piece.
Prime and Paint
I primed my space with honestly whatever I had left over and painted with Shoji White by Sherwin Williams.
Summer is here in the Northeast and I have been craving one of my favorite summer foods: smores! I love the experience that smores give us from picking out your own yummy treats, applying it your stick and smooshing all that gooey-ness together to take one big messy bite!
Our fire pit area is still being renovated but I found some great pieces at Walmart to help us decorate it and make it look more like our style and vibe. I love Adirondack chairs and because our backyard is very woodsy, Adirondack chairs are perfect to sustain our environment. Walmart has great options for an affordable price!
I found a cute galvanized white tray for summer nights where I can bring out drinks or all our smores goodies and assembly them right there.
These lanterns are my favorite find! So pretty and I can bring them in when the weather is cold or rainy and leave them out for evening nights by the fire pit. Once our patio area is renovated they will look great there as well to provide nice ambient lighting. The price is amazing for its quality!
Right now from July 11-13 its Walmart+ week!That means Walmart has tons of summer deals! Also you can sign up for your Walmart+ membership and save 50% off! YUP! You'll get your Walmart+ membership for an annual fee of just $48 (reg. $98).
Run to your laptop or the Walmart app and check out some great deals to save money for all your backyard items! I picked out some of my favorites below to make your shopping easier and save you time!
You can also check out more listing if you follow my shop @thestylebrunch on the @shop.LTK app to shop this post and get my exclusive app- only content! #walmartpartner
I love the preparation that comes with the holiday season. This year I am really into keeping our decor simple and warm. I have been intentional in saving money this year for our household and pushing myself to tap into my love for crafts and creativity.
I visited a couple of local Goodwill and Savers stores a couple months back and found some beautiful handmade pieces that would work for the holiday season.
I wanted to mix old with thrifted and handmade to give our home nostalgia and rustic warm touches.
The stocking tree holders were found at Savers for $.99 each and I painted one white and the other stained it attached a hook and they are now our new stocking holders.
The garland I found at Marshalls this year and its the only new piece that I added to home. It faux but the quality is amazing for the price.
The bells were found at Savers and the gingerbread house garland I handmade myself. Some black card stock, chalk pen and some creativity and you have this fun and whimsical garland for your home.
I must share that the reason that I chose simpler ways to decorate is to keep my heart simple. This season is wrapped with so much hope, joy and peace however the world clouds it with buy more, chaos and stress in our lives.
In order to keep my focus linear I keep traditions simple and find beauty and joy in it. I stay the course keeping my eyes on Jesus and celebrating Him.
Thank you all for your time and I wish you all a very blessed and merry Christmas season 🎄


.jpeg)
.jpeg)


